Wednesday, March 31, 2010

Antique and Salvaged Architecture


In 2001 I achieved my dream of owning an old house.    In 2008 I sold it after seven years of renovation.    Some of the rooms had been ‘updated’ in the 1980s.    As I replaced carpet with wood floors, sheetrock with wainscoting, and trim where there was none, I learned with the proper ‘bones’ any house could look like an old house.

 Some women love to shop for shoes; I love to shop for salvage!


My Studio – Before

My Studio – After

When I found this streamside hunting cabin, I knew its steep gable and general proportions were that of an old house.


Windows are the soul of an old house, and I had two sashes left over from my first house, two given to me by a neighbor that I only had to replace some glass on, and the rest were $15 per sash ($30 for a double-hung 2-over-2) from the Historic Albany Foundation Architectural Parts Warehouse.


Some of them are even wavy glass.
None of my windows are in proper casings.   I just screwed them in with deck screws.


A porch, columns, and gingerbread are things a cute cottage can’t be without.
These columns were $60 apiece at New York Salvage in Oneonta.


I split one in half with a circular saw for pilasters.


The beadboard porch ceiling and tongue-and-groove fir floor is half from my old house, half from New York Salvage.   Altogether it was one of the largest expenses – something like $400 – but a good deal of the beadboard is inside.   The chippy paint and imperfection of damage and age is worth it.


My chippy dark green screen door is from Albany ($25), and I know I have to find a way to reproduce the missing spindles and repair the brass screen, but I love it to bits.


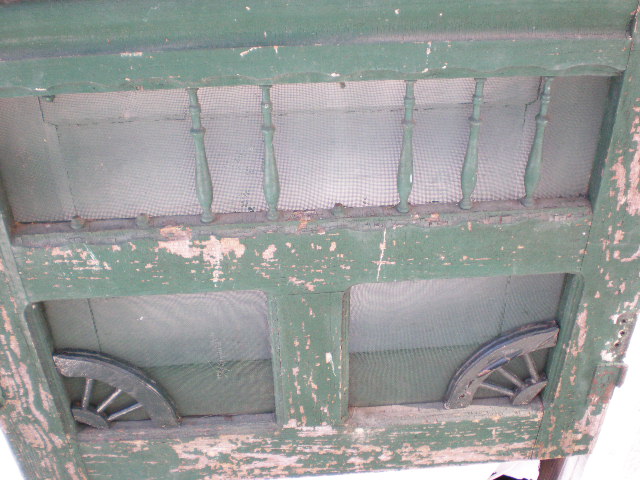
The gingerbread ‘wheels’ and hardware are from New York Salvage.   John has great stuff, including a letter from Rachel Ashwell tacked up on his office bulletin board because she’s a customer, too!


The little brackets on the window cornices are from another $25 New York Salvage door missing its screen and in very poor shape.


I bought it mainly for its door hardware that floored me with its simple beauty.


The plywood gingerbread I cut with a scroll saw is not as thick as it should be, but I’m not a real carpenter so I pretend I don’t notice.


Trim is very challenging to find at salvage because it’s easily damaged when pulled out during demolition, so I am lucky I found this at New York Salvage.   When the snow came off the roof it pulled this section off, so now you can see what a difference a little finishing trim makes.


I know the ends of the flat roof are clumsy.    I know 'what to do' with a hip porch roof, but they’re too complicated for me to build, so I made a flat roof.    Setting the rafters and columns were the only thing I asked for my husband's help on this house.


At least these little corbels ($5 each) from New York Salvage help make it nice.


I found them near this very pretty window frame.     Don’t worry, John at New York Salvage has most of his inventory indoors, and he did a massive clean-up in the fall!


I’d love to wrap the house in old shiplap siding but it would cost too much.    The rough-milled board-and-batten siding is cottagey and late Victorian anyway.

My floors creak and it occasionally smells like an old house, so I’m perfectly happy.    Especially when people say, “Wow, I didn’t know there was an old schoolhouse in this clove!”

Until next time, stay shabby!

I am sharing this with Faded*Charm for "White Wednesday" 7 April 2010,
 My Backyard Eden for "Make It Yours Wednesday",
The Shabby Chic Cottage for "Transformation Thursday" 8 April 2010,
and Cindy's My Romantic Home for "Show & Tell Friday" 9 April 2010!

Tuesday, March 30, 2010

The Shabby Maple Sugar Shack


It’s maple sap season in the Catskills!


My dear husband is crazy about making maple syrup.    I actually don’t care for real maple syrup unless it’s ‘first run’, the first you harvest in February when it’s very sweet and light.


Yummy on Belgian waffles – a lovely late winter Catskill brunch.  
It’s more like a watery ‘drizzle’ than syrup.

But I am CRAZY for the soft maple candies my love makes!


It takes roughly three days of sap collection in seven buckets per day to get 20 little candies.
But so worth it!


Until next time, stay shabby!


Monday, March 29, 2010

A Magic Spring Snow Morning in the Catskills


Friday, March 26 dawned a wintery fairyland.


My spring bulbs are actually coming up, can you believe it?!


‘Till next time, stay shabby!

Friday, March 26, 2010

One Of My Shabby White Mirrors


Mom didn’t want this vaguely European oval mirror with a scrolly top any longer and gave it to me.    What a windfall.    I suppose it dates from the 1920s or so judging from the yellowed newspaper that backs it.    I just swoon over the damaged edge that reveals it.


It used to be dark wood, but that was easily covered with a coat of white paint, in this case leftover China White semi-gloss from painting the Shabby Streamside Studio.   If I ever need to antique mirror glass, I’m glad I have a fabulous example of the real thing.   (I saved this article in case I ever need it.)


It’s been my laboratory for experimenting with crackle paint.   I apologize, but I don’t have the crackle paint any longer as I left it in the barn and it froze, but it had cartoons of men painting on it and stated, “This is the one that works!”.


This is interior semi-gloss China White paint on China White paint. You’re meant to apply the crackle paint in the opposite direction you’ve painted the surface and it’s dry, but it only crackles like this if you put it on raw wood.


I prefer putting the crackle on in the same direction when the paint on the surface is still damp, like this.


If you hit it with a hair dryer, it’ll bubble up and make blisters.   Most of the distressing was done with an old pair of scissors.


If you try to use crackle in an unheated studio when it’s below 50, nothing happens, so don’t bother.


Then, I discovered Cindy’s My Romantic Home blog, and reading back through it learned employing Rub 'N Buff on your project makes the finishing touch by ‘aging’ the brightness of fresh paint. Michael’s didn’t have the color she loves, they just had ‘Patina’, which turned out to be this aqua color I had to rub off.   It was a blessing in disguise.    A wet paper towel and vigorous rubbing gave me this effect, and I did the same around the edges and loved it.   Harder than using sandpaper, but rewarding.


I returned to Michael’s and bought the right Rub N’ Buff, and used it to mellow the white successfully.


These pictures weren’t taken in my studio, it's in my old house, and the mirror is actually stored away at the moment, but I hope to do something with it in my studio’s loft.

Until next time, stay shabby!


Wednesday, March 24, 2010

My Shabby Pink Drapes


My dream drapes were the pink pure silk ones Rachel Ashwell used to sell in her former store, and they were something like $120 a panel, or yard – something like that.  
My current dream drapes are the ‘faux soie’ Simply Shabby Chic sets at Target.


But, it would cost over $200 for them even with splitting the long panel in half and re-stitching the cut edge (my usual trick for saving money), and I just don’t have that right now.


Window before.

I installed the salvaged wavy-glass19th century sashes myself, but I didn’t bother to build a proper casing for them (see the Tyvek sticking out?!), and to save money I didn’t buy salvaged decorative trim.


I went to Jo-Ann fabrics and spent $45 on a few yards pink polyester fabric left over from Halloween meant for little girls’ princess costumes, and some other fabric meant for lining clothing.


I don’t care for sewing. My mother-in-law gave me a sewing machine for a wedding present, and I have a love-hate relationship with it.   I won’t even show you the other valance because I haven’t forced myself to sew it yet!    And they’re actually just tacked up!


It does soften the room, muffling sound and adding grace the way only fabric can.

Until next time, stay shabby!

Monday, March 22, 2010

A Lacy Touch For My China


I’ve been meaning to do this for months.   I’ve always wanted shelves fully trimmed in vintage lace, but I’ve never found enough lace to do the whole project.   So, I laundered and starched some vintage doilies and placed them in the centers of my china cabinet shelves.


They’re small, but they do soften the lines.


Dainty things with dainty things.


Until next time, stay shabby!