Wednesday, February 17, 2010

My Chicken Wire China Cabinet


I noticed Cindy over at My Romantic Home changed her French china cabinet’s cover from the landscape fabric-esque one to chicken wire! Welcome to the world of chicken wire, Cindy!


I made my door in October 2009, but that was before I started blogging so I’ll have to show you an after-the-fact picture.


My door is made from a screen porch window frame I bought at Albany Salvage for $10.   I removed the screen and saved it for future screen door repairs.   I took two lengths of chicken wire off of the bottom of my coop and replaced them with wood, which will repel mice a little better anyway.


The wire cuts very easily with the sharp inner part of pliers, or you could use jewelry wire cutters I suppose. I re-sized my door with a circular saw, and nailed these funny little nails in the corners for strength. Hopefully your door will exist in the first place. I also had to ‘sew’ the two pieces of chicken wire together.
Then, I laid the door on the floor, attached one side of the chicken wire with a lot of electric staples, stretched it along the top and bottom, and then did the other side. It was the easiest part of the project!

Even though my chicken wire was already shabby with a zinc-like patina, I experimented with painting one side white and liked it a lot better.
You can find chicken and landscape wire at your local independently owned hardware store.   Chicken wire is inexpensive, landscape wire isn’t.    Krylon makes a spray that gives a patina in rust or zinc.    Nice vintage brass screen (great for pie safes) is found at salvage yards.


Chicken wire also comes in a very large hexagon shape.


This is landscape fabric.  Another texture.


This is vintage landscape fabric.   Thanks to my hens for allowing me to shoot their coop.

I’ve been enamored with furniture with wire fronts for years, but it was Fifi O’Neill that inspired me to do my china cabinet this way.   Is wire inherently French?   If so, I’m going to load up on wire baskets, wall caddies, tchotchkes, whatever.


Merci beaucoup, Fifi et Cindy!

‘Till next time, stay shabby!


Tuesday, February 16, 2010

Wavering White Wednesdays


I’m considering sending this in for the weekly White Wednesday at Faded*Charm.   I love white, I have so much white in the studio, and I’d love to share pictures!     But, I’m not confident about this shot.   My chandelier isn’t finished.    It’s hung too low.    I think the tablecloth should be white.    I really want to put my best foot forward with ‘the big blogs’, so I think I will wait.

Monday, February 15, 2010

Happy 5th Birthday Little Miss ZuZu

 
Mommy's little angel, Daddy's little girl.
No Westminster pooch will ever be as cute as my cutie patotootie.
No puppy was ever so loved and revered.


Sunday, February 14, 2010

My Shabby Office


When I’m not doing what I love at the Shabby Streamside Studio, I’m a federal employee working as a fiscal administrator. I’m incredibly lucky to have 12 years at such a nice office with such lovely colleagues. I’m known both as ‘The Pink Lady’ (for obvious reasons), and ‘The Egg Lady’ since I bring my hens’ eggs in to sell when I have too many.


I’ve been able to have a flexible schedule, which has been a boon from the 7 years I worked two full-time jobs, to now when I need more time at home.


Until next time, stay shabby and make it a great day!

Saturday, February 13, 2010

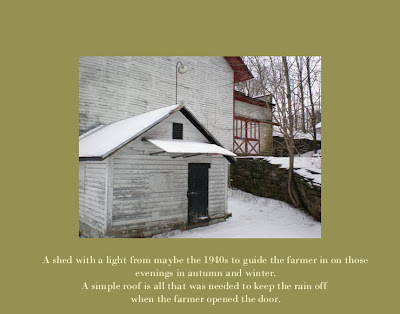
One of Our Catskill Drives in February


The tiny, tidy college town of Delhi is the sweetest little settlement, bustling in the gentle rural way one sees in the western Catskills.   It’s also the only village near us that has a large supermarket with a pharmacy, and how lucky we are to get to make a drive there even if it is to pick up medication.

The wonder of this locale is you can pass Victorian homes packed on a street porch against porch, cross a creek, wind up a hairpin turn, chug up a long wooded road with a steep gorge on one side, round a bend, and pass a farm like this surrounded by hundreds of acres of pastures backed by tall mountains covered in trees and snow. As if there were no campus, no two traffic lights, no Price Chopper, no 21st century.


This abandoned farm is unusual because the year the barn was built isn’t writ large across the gable like most barns in the area; it should have ‘1871’ or some year from the late 19th century upon it.   From what I’ve read, a barn complex this big went in as the railroads came to the Catskills.   With a reliable way to get milk from barn to creamery to New York in the same day, huge dairy operations sprung up over the region. Before that era, barns were built for family subsistence and tended to be much smaller.


The farm doesn’t have a real estate sign--perhaps the owners are in a nursing home or Florida.   I hope someone eventually will buy this pretty place and keep it wonderful.

I’m glad you came on the drive with us.   Until next time, stay shabby!

Friday, February 12, 2010

A Victorian Valentine


Few things are as romantic as sweet little Victorian valentines.

I ordered these from Bella Sera at Etsy, they cost $5.50 for 6.

I settled down with a cup of tea and the 1989 Victoria, and thought you’d like to share these memories.

Photo by Toshi Otsuki


Photo by Joan Hix Vanderschutt

Aren’t these stand-up cards terrific?  Imagine sweeping into the drawing-room, your heavy skirts dragging over the carpeting, and finding your husband by the fire in his cut-away tuxedo and cravat holding one of these for you?

May all your dreams come true this Valentine’s Day!

Until next time, stay shabby!

Mom's Gift of Valentine's Day Scones


During the blizzard yesterday, my Mom made “the King & I” tasty, fluffy scones with red sprinkles on top! We’ll share them after reheating on top of the wood stove in our cabin.

Thanks, Mom!

Thursday, February 4, 2010

A New Season of Love


The holidays are too short.
The week of December 25, stores already have their holiday merchandise shoved onto clearance shelves, and the day after Christmas radio stations revert to their normal format. 

The holiday spirit remains strong in me until Martin Luther King Jr. weekend.   Here in my studio, I can do whatever I want, anyway!  

But, Valentine's Day is just around the corner, and I don't want my holiday things to become dusty and damaged, so it's time to step forth into the rest of winter.


I'm Dreaming of a Pink Christmas


'Till next time, stay shabby!

Wednesday, February 3, 2010

My Shabby Pink Christmas Tree


Growing up, the only trees I’d ever seen were the usual quaint suburban family fare and department store fakes with triad clusters of satin balls in harvest gold and red.

Two trees I saw in college changed the way I approach Christmas trees forever.

I took shelter at the new Rowes Wharf hotel at South Station one evening in 1987 waiting for a bus to Worcester to see Rush on their Hold Your Fire tour, and I was transfixed at the pink tree in the rose-orange marble and granite lobby.

It was a concept tree – Victorian. The very tall and wide blue spruce set the rich pink and gold brocade and damask ribbons off beautifully. Overflowing with 1980s excess suited it well; it was wired to its invisible core with lights wrapped around every branch twice, and those gorgeous Krebs Lauscha Glas ornaments and many others crowded it so I wondered how they hung them without hitting each other.

The fact the tree was free standing in the center of the lobby drove home the importance of decorating all sides of a tree; one always can see to the other side. Mauve-rose silk poinsettias tied it all together, and these were echoed by the bi-level bank of real pink poinsettias surrounding the base in lieu of presents.

There were lights like traditional candles, lights like pinecones, lights like stars. I’d think I’d seen everything, and then I discovered a constellation of putti around the pearl garland, and then some other vignette. And all glittered dainty gold as if angels had dusted it so.

The other tree that rocked me was a tiny picture in Vogue of a deceptively simple treatment: over-lit, covered in so much babies’ breath it looked like a veiled bride, and ringed in pink poinsettias around the base. This tree taught me you can never have too many little flowers on a tree.

My trees in the late 80s were so pretty, with foamy spheres of dried babies’ breath on them, but they eventually browned and crumbled. I suppose babies’ breath became a pariah of the 1980s like the mullet, because I haven’t seen it in floral supply places since Clinton was in office.

I learned from these two trees and added my own tenets, if you will indulge me.


I like my tree to convey an over-arching state of winter grace.


Achieving this is easy with:

Branches flocked in spray snow and glitter

Soft colors (no hot pinks or bright aquas)

Detailed floral and ribbon clusters at the top where it's tricky to decorate


Vintage ornaments


Ornaments with a lot of individual detail

I make sure the trunk is obscured with silk poinsettias, ribbon, and large ornaments so no ‘sneeze’ interrupts the symphony.

Another important thing is I consciously form a vertical emphasis that leads the eye upward.

This verticality is created by the use of:

Candy canes
 
 
Icicles


Ribbon run top to bottom,
and oblong ornaments (round ornaments have to be stunning, I actually avoid them).

My pearl garland doubles as an exterior event that ‘fences’ everything in, creating depth and therefore a sense of wonder. It’s really just a roll of pearl string I bought at the now defunct and very missed Patchogue Floral. The pearls at the top are half the size of the lower level pearls for proportion.

Lastly, I employ 5 strands of the tiniest lights, most importantly micro lights with different blinking settings so the tree sparkles. These came on the market a few years ago, perfect timing in my case because my 20 year old sets were dying or dead.   I have lights shaped like pinecones and stars,
just like that Rowes Wharf Hotel tree did.

I avoid trends like giant glittered numbers or words.

My new 6’ tree was purchased for $25 on sale at Target, and it’s my first artificial one. I tired of the expense and mess of real trees, and the only thing I miss is the smell, but reed diffusers and potpourri really makes that a non-issue. Besides, a real tree would be impossible to bring across the creek due to its weight, and we take up the bridge before winter, leaving only the tightrope to cross over.


I like the tops of the branches covered with birds and beribboned silk or paper roses because they’re very plain with just spray snow.

When assembling, I’m thrilled to see all my old friends again, and surprised when I’m reacquainted with something I bought at the post-holiday sales and forgotten.    I put on all my holiday music and decorate from the inside out, stand back and look often, and edit without hesitation.   Things I’m not enthusiastic about any longer I put in the back as ‘filler’.    It takes three to five evenings to do my tree.    I love every second.


Till next time, stay shabby!

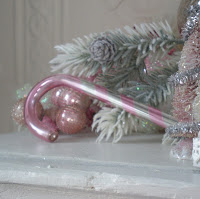
Pink Candy Canes Save Shabby Pink Christmases


Since I decorate in shabby pinks, it's challenging to keep it looking "Christmasy". In my insecure moments it looks as if I’m welcoming a baby girl into the studio.


So, my antidote is to use spray snow, snow blankets, white marabou, and the greatest cure in my bag: pink candy canes!


More than snowflakes or frosted pinecones, pink candy canes dispel all doubt that Christmastime is here. Unlike snowflakes and pinecones, candy cares are the exclusive property of Christmas, whereas the former are found in general winter vignettes as well. They’re inherently festive, rousing sweet memories of gingerbread houses and visions of sugarplums.


They are the holiday calling card of The Shabby Streamside Studio.


The only pink canes I've ever found for sale were at Caramelo's in 2008.

I’ve created almost every pink candy cane I have because I’ve almost never seen them for sale.   Around 1990 I critically surveyed my tree, feeling the seashells made it look more like a decorative topiary than a Christmas tree.   In a variety store, I picked up a pack of canes and noted the red cellophane ribbon around a dainty white plastic candy cane was coming off. I bought them and at home removed the red and painted them pink.   I regret my sloppy job, but it was probably the last day of my vacation or something.

I’m far from proficient, but who cares?     I’m a neophyte and it shows.   The important thing is I have fun and it looks pretty.   Glitter covers a multitude of sins.

How I love the relaxing time at the end of a day!    To take out my craft tub and sit to turn some common object into an object of beauty is bliss.

Last year, I felt I needed candy canes absolutely everywhere, so I picked up a few boxes of red and white plastic canes at the dollar store.


At first, I painted the red over with pink craft paint.   It was tedious and I’d get it on the white anyway. Worse, sometimes I could see red in there still.


Then, I decided to spray paint the whole lot and add a stripe of pink or white later.    I prefer this method. Everything gets sprayed with glue, glittered, and enjoyed!


Target has a good selection of various size plastic candy canes every year, and these were made with wrapping beautiful vintage style seam binding from
the wonderful, incomparable, blissful Etsy shop Bluebirdlane.


For thin candy canes, look in your local independent hardware store in the aisle they offer electrical wire. Bendable white wire is pennies a foot, and I made a huge amount for less than $5.


I once made of series of beaded candy canes, but they got so lost on the tree I regulated them to the back.


Michael’s and Walmart recently sold absolutely wonderful twee canes and candies I incorporated into everything.    It’s time consuming to do these, but the effect is galvanizing.


Real pink and white candy canes are sold within the easy-to-find Jolly Rancher candy cane set, albeit only two are in a box. I get three boxes and keep some in a cup for that hostess touch. I’ve googled over the past 4 years for a source of pink and white cane, ribbon, and hard candy without success. Someone makes custom candy but it costs too much and it can’t be stored. One year Bath and Body Works had pale pink and cream ribbon candy but it was $7 for a single piece!


I’ve really enjoyed sharing my pink candy canes with you, gentle reader. They make me happy and I hope they’ll make you happy, too.


Until next time, stay shabby!